Can You Use HTV on Wood? Complete Guide for Best Results
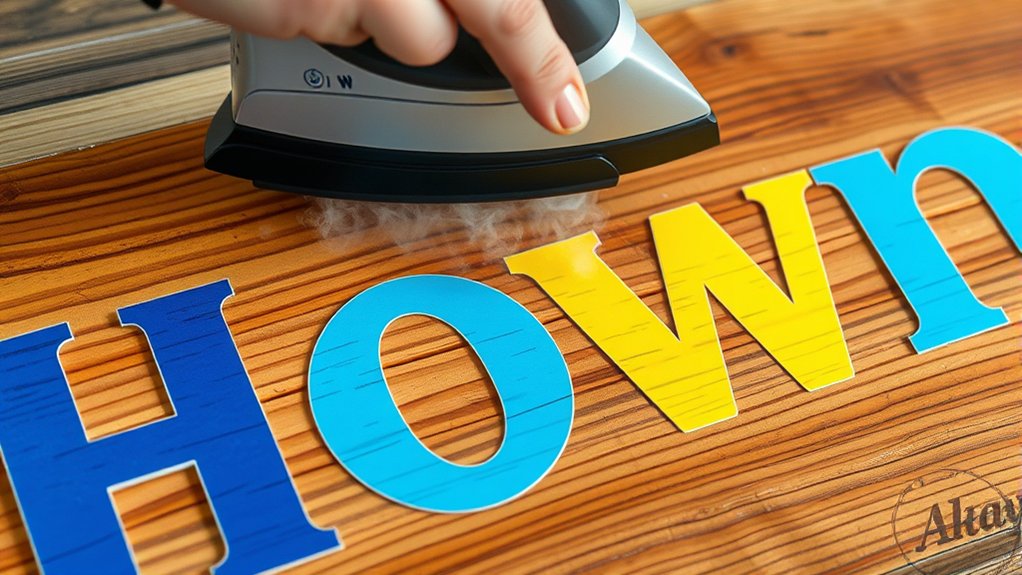
Yes, you can use heat transfer vinyl (HTV) on wood for a durable and vibrant finish. Start by ensuring the wood surface is smooth, clean, and free of previous finishes. Use a heat press or iron set to around 300°F, applying consistent pressure for about 40 seconds. Be cautious with textured surfaces, and double-check your peeling technique. Sealing your project afterward can enhance longevity. There’s more to master for the best results, so let’s explore further insights!
How to Successfully Use HTV on Wood?
When you’re ready to apply HTV (heat transfer vinyl) on wood, start by ensuring that your surface is well-sanded and smooth, as this is essential for achieving ideal adhesion.
Next, set your heat press or iron to about 300°F. Press with full, even pressure for 40-60 seconds, depending on your vinyl type.
For projects involving color blending or pattern layering, consider pressing multiple times to get a seamless design.
Once pressed, peel the transfer sheet while it’s warm or cool, following the manufacturer’s instructions to avoid lifting.
If you’re working with textured wood, be patient during peeling.
Finally, seal your design with a clear spray or polycrylic to enhance durability, especially for outdoor projects.
Benefits of HTV for Wooden Surfaces

Using HTV on wooden surfaces opens up a world of versatile design options that you can easily customize.
You’ll appreciate the quick application process that eliminates the mess of traditional painting, allowing you to focus on your creativity.
Plus, once applied, HTV provides a durable finish that stands strong against everyday wear, ensuring your designs last.
Versatile Design Options
How can you transform wooden surfaces into stunning works of art? Using heat transfer vinyl (HTV) opens up a world of versatile design options for your projects.
With HTV’s precise cutting and weeding process, you can create intricate designs, including small fonts and complex images, that will truly pop on wood. The textured surface of wood allows HTV to mold and conform seamlessly, giving your pieces a professional finish reminiscent of painted signage.
Plus, you can take advantage of design layering to blend multiple colors without worrying about melting or distortion. This method isn’t only time-efficient compared to traditional painting but also allows for durable, personalized designs that enhance the natural beauty of the wood.
Easy Application Process
Transforming wooden surfaces with heat transfer vinyl (HTV) is not only simple but also efficient, allowing you to achieve professional-looking designs without the hassle of traditional methods. You can easily apply HTV using a heat press or household iron, making it quick and straightforward. Its flexibility lets HTV mold into the wood grain and helps create a painted or stained look without extra steps.
Here’s a quick overview of HTV application benefits:
| Benefit | Description | Application Tips |
|---|---|---|
| Fast process | Minimal equipment required | Use a heat press or iron |
| Clean application | Eliminates mess of paint or stencils | Prepare the wood surface |
| Excellent adhesion | Adheres securely to smooth, well-prepped wood | Ensure proper temperature |
| Creative flexibility | Allows color coordination and pattern selection easily | Plan your design beforehand |
| Durable results | Long-lasting finish suitable for projects | Choose quality HTV |
Durable Finish Quality
Achieving a professional finish with heat transfer vinyl not only enhances the visual appeal of your wooden projects but also considerably boosts their durability. HTV provides a paint-like, matte finish that mimics hand-painted signs, making it perfect for any aesthetic.
When applied correctly, it creates a sealed design that resists peeling, cracking, and weathering, ensuring your work lasts longer. The HTV molds into the wood grain, enhancing texture for an authentic look that traditional vinyl can’t match.
Plus, you won’t need multiple paint coats or complex stenciling, saving you time. For extra durability, seal your design with a topcoat or varnish, making it suitable for both indoor and outdoor wooden surfaces while keeping color matching effortless.
Surface Preparation for Optimal Adhesion

To guarantee ideal adhesion of heat transfer vinyl (HTV) on wood, it’s essential to start with a well-prepared surface. Begin by ensuring that your wood is smooth and free from dust. Sand the surface thoroughly to enhance HTV adhesion.
If the wood has any previous finishes like paint or poly, remove those to avoid interference during the heat transfer process. For textured or uneven surfaces, consider sanding or applying sealing techniques, such as a light coat of water-based poly, to create a more uniform texture.
This not only improves adhesion but also increases durability, especially for outdoor projects. Don’t forget to test different preparations on scrap wood to find the best method and temperature for your specific application.
Your Go-To Tools and Settings for HTV
When you’re ready to apply HTV to wood, having the right tools and settings can make all the difference in achieving a professional finish. Here’s a quick reference for your projects:
| Tool/Setting | Recommendation |
|---|---|
| Temperature | 300°F |
| Pressing Time | 40 seconds |
| Pressure | Full pressure |
| Cooling Time | 10 seconds before peeling |
Using Cricut Easy Weed HTV, remember to choose vibrant color selections for eye-catching designs and explore pattern customization for a personal touch. Always use a Teflon or parchment cover sheet to avoid sticking, and test on scrap wood to adjust pressure and timing based on the wood surface and vinyl type. Enjoy crafting!
Common HTV Application Challenges on Wood
When working with HTV on textured wood, you might face peeling issues due to uneven surfaces that can trap air and disrupt adhesion.
Additionally, excess heat can trigger tree sap to ooze out, sticking to your equipment or contaminating your vinyl.
Understanding these challenges will help you find effective solutions for a successful application.
Peeling Issues on Textured Wood
Applying heat transfer vinyl (HTV) on textured wood presents unique challenges, particularly with peeling. The rough surface can lead to peeling difficulties, where the vinyl adheres inconsistently, causing patches to lift during the peeling process. Even with repeated pressing using fingers, some areas may remain prone to lifting.
| Texture Challenges | Solutions |
|---|---|
| Uneven surface can lift vinyl | Use a warm peel method |
| Difficulty in peeling smoothly | Be patient and guide carefully |
| Patches of lifted vinyl | Press down firmly |
| Adhesion issues | Experiment with pressure |
Understanding these texture challenges and employing the right solutions can minimize peeling issues, ensuring your HTV design stays intact on textured wood.
Managing Tree Sap Complications
Tree sap can be a tricky hurdle when using HTV on wood, especially pine, where excessive heat can loosen the sap and make it sticky. To guarantee successful HTV application, effective sap management is vital.
Avoid using Teflon sheets, as sap can adhere to them and risk contaminating your vinyl design, complicating clean removal. Instead, consider Teflon alternatives like parchment paper, which can safeguard your surface during application and minimize sap transfer.
Be mindful that dried sap may appear clear or cloudy, and careful handling is key to prevent any transfer onto your vinyl or transfer sheets.
Fixing Lifting Issues With HTV
Even if you’ve followed all the right steps, lifting issues with HTV can still crop up. If you notice any lifting, reheating the affected area with your household iron at the same heat settings used during your initial application can often help to re-adhere it.
Make sure to apply firm, even pressure while re-pressing, as this improves adhesion and minimizes future lifting. Don’t forget to clean the surface before reapplication; it’s essential for effective bonding.
If the lifting persists, try multiple pressing cycles, focusing on problematic areas. Ultimately, ensure the vinyl is cooled sufficiently before peeling to maintain its adhesion.
Proper color matching can also help, as mismatched colors can lead to more lifting issues.
Best Practices for a Professional Finish
To achieve a professional finish when using heat transfer vinyl (HTV) on wood, it’s crucial to follow best practices that maximize adhesion and aesthetics.
Start by preparing the wood surface: sand and clean it thoroughly for a smooth base, preventing imperfections.
Prepare your wood surface by sanding and cleaning it thoroughly to create a flawless base that prevents imperfections.
Next, use a consistent heat press or iron set to about 300°F, applying full, even pressure during pressing.
For ideal adhesion, peel the transfer sheet while the vinyl is warm.
When working with multiple colors, layer HTV carefully, making sure to cool each layer slightly to ensure crisp edges.
To enhance your design’s appearance and longevity, consider color blending and pattern customization techniques.
Finally, seal your project with a clear, water-based poly for added protection and a polished look.
Caring for Your HTV Projects on Wood
| Tip | Action | Reason |
|---|---|---|
| Protect from moisture | Keep projects dry | Prevents peeling |
| Seal the design | Use water-based polycrylic | Enhances durability |
| Avoid harsh cleaners | Use mild soap and a soft cloth | Prevents damage to vinyl textures |
| Don’t apply heat | Avoid direct heat | Stops lifting or melting |
| Handle with care | Store carefully | Prevents scratches and dents |
Frequently Asked Questions
Can I Use HTV on Stained Wood Surfaces?
Yes, you can use HTV on stained wood surfaces. Proper surface preparation, like sanding and testing adhesion, boosts adhesive strength. Make sure the stain is cured, and consider sealing for improved durability and effectiveness.
What Types of Wood Are Best for HTV Application?
Selecting smooth, unfinished wood is like choosing a blank canvas for your art. The best finish types for HTV applications include matte or satin; avoid glossy surfaces to guarantee your design adheres well to the wood grain.
Is HTV Dishwasher Safe When Applied to Wood?
HTV isn’t dishwasher safe on wood unless you’ve properly sealed it. Without surface prep and waterproofing, the heat transfer vinyl can weaken from moisture and heat, leading to potential damage and peeling. Hand wash for best results.
Can I Layer HTV on Wood Projects?
Yes, you can layer HTV on wood projects. With proper surface preparation and careful layering, you can achieve stunning designs. Just remember, adhesive strength may diminish if you rush the pressing process. Take your time!
How Long Will HTV Last on Wood?
HTV can last several years on wood with proper heat transfer techniques and thorough surface preparation. Sealing the project enhances durability, particularly in outdoor conditions, while regular cleaning helps maintain adhesion and appearance over time.
In the Final Analysis
In summary, successfully sticking HTV to wood can transform your projects into stunning statements. By preparing your surface properly and using the right tools, you’ll experience effective adhesion and exceptional results. Remember to monitor for common challenges like lifting, and apply best practices to ensure a polished finish. With a bit of patience and persistence, your wooden wonders will wow everyone, showcasing your creativity and craftsmanship for years to come. Happy crafting!